Gorilla tag is a popular Virtual Reality game where players enjoy playing tag with online friends and as the name suggests the movement is gorilla-like jumping from one surface to another which makes it further interesting.
The game wouldn’t be what it is without custom mods. If you are a fan of using custom mods in Gorilla Tag then Monke mod manager is a must-have app.
Monke mod manager is a mod installer developed by Deadly Kitten. The app installs and updates custom mods automatically into the Gorilla tag. An impressive thing about Monke mod manager is that it notifies you of any mods that need updating upon launching the app.
How To Install Monke Mod Manager

Download Monke mod manager from the GitHub of its developer.
https://github.com/DeadlyKitten/MonkeModManager
After downloading double click the executable file to run the installer.
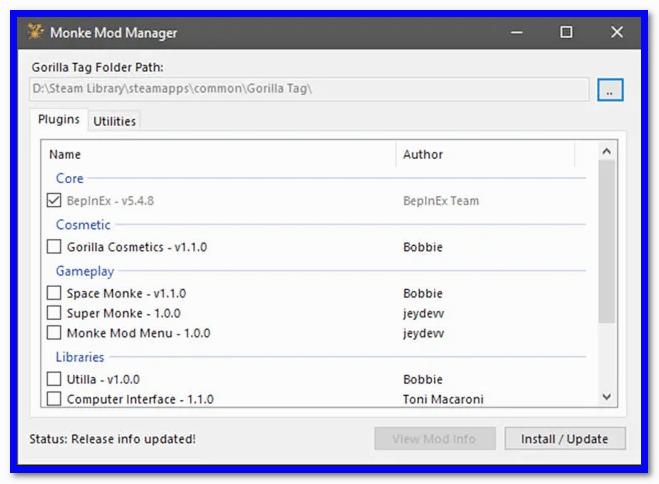
By default, the app should automatically fill in your Gorilla tag installation folder. Note that if you installed Gorrila Tag on a separate drive or path, the app will prompt you to select the game’s executable file from the installation folder. Once this is done you can now move to the next step.
Choose any mod you want to install from the mods listed by checking their corresponding boxes. Don’t try unchecking the BepInEx as this is the mod loader for the app and cannot be unchecked
If it’s your first time modding, then launch Gorrila Tag once and close it in order to initialize BepInEx.
To update a mod simply select the mod and tap the install/update button. This will update the mod if it has an update.
At times you may not see the mods appear the first time you launch gorrila tag – don’t worry. Simply relaunch the game and you will see the installed mods appear.
System Requirements for Installing Monke Mod Manager
System requirements should be the least of your worries when installing Monke mod manager. The app runs on any modern operating system and only takes up a space of 218kb. That’s all you need to know about Monke mod manager and how you can install it.

