Are you experiencing a connection failure error while playing Overwatch? This is what I am going to help you with if your answer is yes. In an Overwatch game, this type of issue can prevent you from actually playing the game as it leaves you unable to play at all.
For those of you who are having issues regarding the Overwatch game server connection error, I will explain a few things you can do to fix it. Below is the list of things that you can do:
How To Fix Game Server Connection Failed OverWatch
These are some fixes that you can apply to resolve the Overwatch game server connection failed issue without having a hassle.
Use Task Manager To Resolve Game Sever Connection Issue
Follow the below-given steps carefully to fix the overwatch game server connection failed error on your gaming computer.
1. First of all close all the Blizzard games along with the Battle.net Client.
2. Now open the Task Manager by Pressing the CTRL+SHIFT+ESC keys together. After this on the Task Manager, Go to the Processes Tab.
3. Select all Blizzard programs such as agent.exe & Blizzard Update Agent and select End Process.
4. After this, Press the Windows + R keys together to open Run Dialog Box.
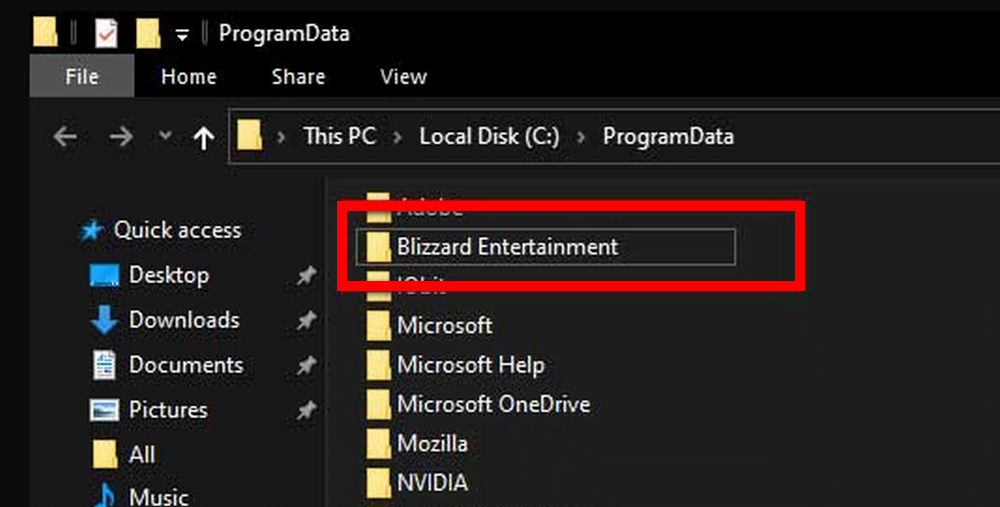
5. Type “%ProgramData%” in the run box and hit the enter button.
6. In last navigate to the Blizzard Entertainment folder located inside of the ProgramData folder. Select it and delete it.
7. Relaunch the Battle.net app along with OverWatch and enjoy your game.

Winsock Data Should be Reset
Winsock data can be reset by following the next step. A Windows network software will use Winsock to access network services. The Winsock interface contains information about how this networking software will access network services. You can re-set the Winsock data by following these steps:
- As a first step, you should press the Windows logo key followed by the letters CMD in the search box.
- When you have reached the command prompt option, right click on it and choose To run this program as an administrator.
- To launch Command Prompt, simply click Yes to allow it permission to run.
- The fourth step is to type the netsh winsock reset command on the CMD and hit enter.
Restart your PC and check if Overwatch connects to the server. In the event this does not happen, proceed to the next step.
Avoid Interference With Wireless Networks
Suppose Overwatch lost connection with the game when you were using a wireless connection when you were playing on your PC. If that is the case, then it would be best to use an Ethernet cable. As LAN is a more stable internet connection than wireless, LAN can help you fix the problem. Do follow these steps in case if you don’t have a LAN cable with you at that time:
- Firstly, put your router in a new location as soon as possible.
- Also, make sure that the devices are not too close to the router or turn them off if they are close to the router.
- The third step is to launch the Overwatch game in order to see if the error has been resolved.
The DNS Server Should be Changed
This service provides an increase in speed and security as a result of using Google Public DNS. Therefore, it is likely that you can achieve better performance by changing the DNS, and as a result, you may fix your issue.
- The first thing you need to do is click on the Windows key and type the words Control panel, and hit enter.
- Next, you need to choose a category from the control panel on the left.
- It will redirect you to a page where you will be able to view the current network status.
- Lastly, click on the button that says “Install” to begin the installation process.
- Click on the current network and select Properties from the context menu.
- Double-click on Internet Protocol Version 4 (TCP/IPv4). That should be the sixth step, and you are done with that.
- You must select the obtain IP address automatically option after that. Alternatively, you can make use of the following DNS servers.
Driver Updates are Needed
Your computer’s driver files might be outdated or missing, leading to Overwatch game server disconnects. To fix this problem, you can update your network driver using either one of two methods. You can edit it either way, but the recommended method is the first one.
To manually update your network driver, go to the manufacturer’s website, search for the latest driver for the network adapter, and install it. In this case, you will need to update the network driver by going to the manufacturer’s website and searching for the latest driver.
Update the network driver automatically: The driver updater software will automatically update the network driver with this method. In addition, you don’t need to download or search for any drivers. Here’s what you need to do:
- First of all, download and install the Driver Updater.
- Following this, you have to run the application and click on the scan now button to start the scanning process. A scan will be begun and the program will try and detect problems on your system.
- Finally, in the third step, you have to click on the update next link in order for you to update automatically and download the updated version of the application.
It’s time to restart the network
It is essential to restart your network as the first thing you can do. If you do this, you will automatically gain access to an average internet speed within a brief period. If you wish to do so, then please follow these below-mentioned steps:
- I want to tell you that the first step is to unplug your modem or router from the electric power supply for at least 60 seconds.
- After that, you need to plug in your network device again and wait until the router has been energized before you can go any farther.
- To confirm whether the error is still occurring, you must relaunch Overwatch.
- If this does not resolve your issue, do not worry. Follow the steps listed below to resolve your issue.
Renew your IP address and DNS
In many cases, DNS or IP can cause the Overwatch game server connection to fail. So you should replace the IP address and flush out the DNS settings to fix the issue.
Here are the steps you can take:
Flushing the DNS:
1. The Run dialog is launched when the Windows + R keys is pressed simultaneously.
2. Type CMD and then press Ctrl, Shift, Enter at the same time to open the command prompt as an administrator.
3: Launch the command prompt by clicking on the yes button.
The fourth step entails typing ipconfig /flushdns and press the enter button.
Renewing the IP:
- Start by pressing both the Windows+ R keys at the same time.
- In order to run the Command Prompt as Administrator, type CMD and then press Ctrl, Shift, and Enter at the same time.
- The third step is to type in “ipconfig /release” into the CMD and hit enter.
- Then press “ipconfig /renew” on the keyboard and the process will be completed.
- The last step is to launch Overwatch and see if the issue has been resolved.
Proxy Server Should be Disabled
Proxy servers may be the cause of the connection problem if you are using one. The solution is as simple as this:
- Open Run Dialog by pressing the Windows logo key and R at the same time.
- Secondly, you must type down intelcpl.cpl and press enter.
- After that, you must click on the “Connections” tab. Ensure that no connections are dialed.
- To configure LAN settings, click LAN settings.
- Uncheck the box next to LAN proxy server. To enable automatic detection of settings, select the checkbox next to Automatically detect settings if not already checked.
- Click the OK button at the bottom of the screen.
- Use a VPN or a proxy server if you are using one.
Let’s see if you still experience the Overwatch game server connection error when launching the game.
Apps That Lag Bandwidth Should be Closed
It is essential to use software such as OneDrive or Dropbox to download and upload your files online. When you do so, Overwatch is at risk of losing connection. Here is what you need to do to close the bandwidth-hogging applications:
- Open the Task Manager by pressing Ctrl, Shift, and Esc simultaneously.
- Then right-click the application that consumes the most network bandwidth.
- After that, select the End task option.
- Overwatch should be launched to see if the problem with Overwatch losing connection to the server has been resolved.
Final Words:
So that was the solution to your overwatch game server connection issue. You can now go ahead and check out these solutions to see if they are working for you. We will help you out with any questions you may have by commenting below, so let me know if you have any more.

