Polish your Overwatch 2 hero’s aim skill by adjusting the Crosshair setting in the PC and Console. You can simply do that by Customizing Crosshair in Overwatch 2.
With Customization in your Crosshair Setting, you can become a pro too. After exploring various options, you will find your perfect weapon and hero and can get your headshot every time.
Overwatch 2 Crosshair Customization is not only limited to adjusting the scope and aim, but you can also adjust the crosshair aim color concerning background graphics, so the aim won’t get blurry or submerge with background colors. You can also aim for long-range shooting.
Now, without further delay, let’s find out In Overwatch 2 How to Change Crosshair?
How To Change Crosshair in Overwatch 2?
You may follow this step to Change Crosshair in Overwatch 2. We have breakdown the process into those steps for better understanding.

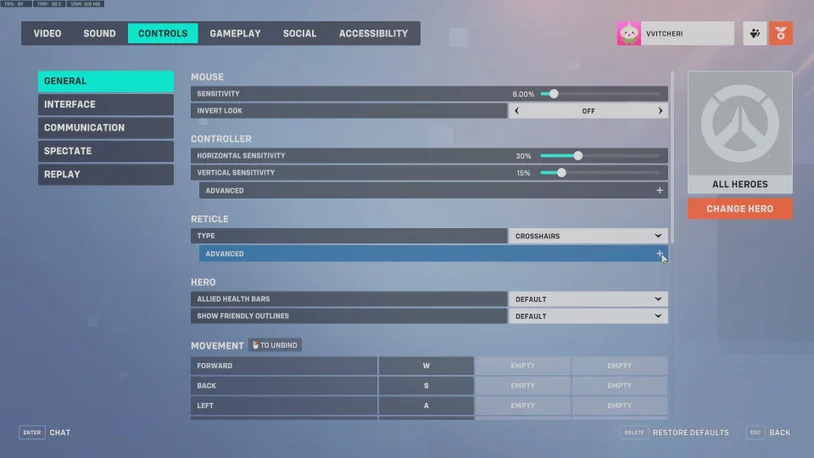
- Go to the main menu, PC users can do that by pressing the ESC key.
- In Menu, head to the options tab.
- Now, you have to select the control.
- Head to the general, in the third row there will be the option of RETICLE.
- In Reticle, click on the Type and there will be options for you to choose, such as Default, Circle, Crosshairs, Circle, Crosshairs, or Dot.
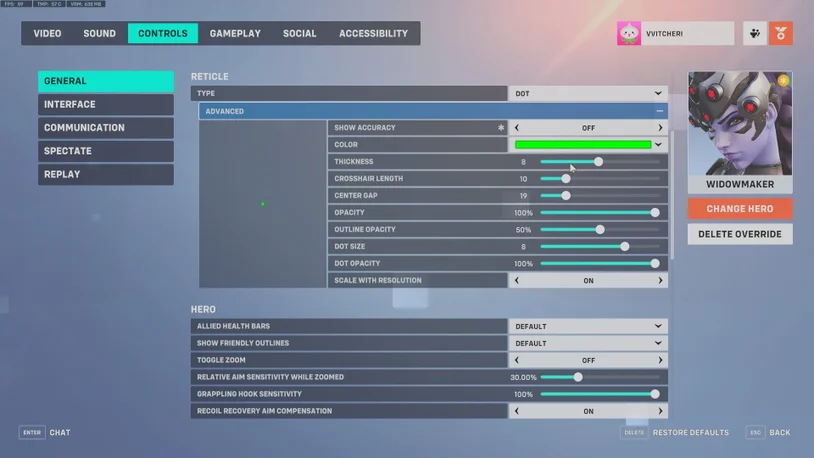
- Below that, there is the option of customization, you can click on the advanced tab on the “+” sign.
- As you click on the “+” sign, you can customize the following settings
- You can on or off your Show Accuracy
- Customize the color of the Reticle
- Adjust the thickness of the circle
- Adjust the gap between the circle
- Adjust the Opacity of the circle
- Adjust the Outline Capacity
- Change the Dot Size of the Dot Reticle
- Adjust Dot Opacity
- On or Off Scale With Resolution Toggle
Other than that you can change the Crosshair setting for your Overwatch 2 Hero, there are different heroes and all have their specific abilities. So need to change the setting as per heroes.
How To Adjust Crosshair Settings for Overwatch 2 Heroes?

In Overwatch, you can customize all the hero’s crosshair settings. And it won’t impact the other hero.
Here we have listed all things you should know about, Overwatch 2 How to change Crosshair Heroes:
- Go to the Menu, and PC users can press the ESC key too.
- From there click on the OPTION tab.
- Further, select the CONTROLS tab
- On your right select the Change Hero Option
- From there you can select your unlocked Hero
- After that head to the RETICLE menu and tap on the “+” to make customization of your hero.
If you are a beginner and wondering what customization I should do, do not worry we have covered you up.
Overwatch 2 Crosshair Setting for Beginners
It’s all a game of trying and testing individual settings as per your precision.
Make this setting
- Small Reticle
- High Contrast
Small Reticle will allow you to get a precise shot and high contrast won’t get blurry or fade in the environment.
For High Contrast, we are suggesting you equip Neon Green, Magenta, or Cyan. This color won’t submerge in the environment or not fade in dark or light. Other than that we will suggest you do not choose black or white, it will easily blend in the environment.
Conclusion
Here in this guide, we suggested how to change the crosshair setting in Overwatch 2. Follow the steps to change the crosshair, nonetheless, you can change the crosshair setting for individual heroes too.
You have to select the hero and change the settings as per heroes. No matter what change you make, make sure you can locate the crosshair on the enemy with perfect vision, for that keep the reticle small and contrast high with Neon Green Color, Magenta, or Cyan. Further, there are a lot more micro adjustments you can make in the crosshair.

