Escape from Tarkov is an intense and unforgiving game that challenges players to survive in a hostile environment. One of the quests in the game, “Shady Business,” introduces players to a mysterious character named Skier, known for his dubious dealings.
In this article, we will explore the details of this quest, including the dialogue, requirements, objectives, rewards, and a comprehensive guide to help you complete it successfully.
Requirements
To embark on the “Shady Business” quest, players must reach level 20. This requirement ensures that players have gained sufficient experience and knowledge of the game mechanics before delving into this challenging quest.
Objectives
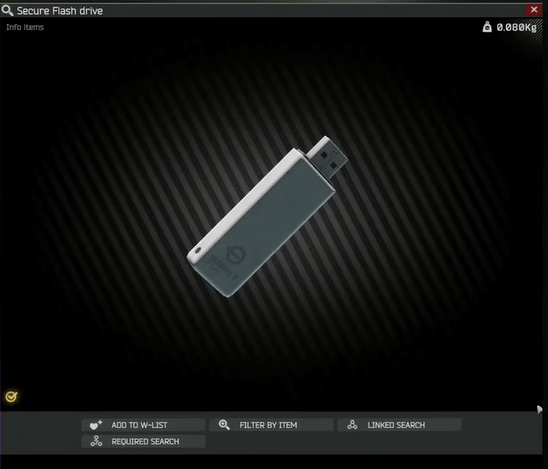
The main objective of the quest is to find and secure three Secure Flash drives during a raid. These flash drives are valuable items sought by Skier. Once obtained, the player must hand them over to Jaeger, who will use his expertise to analyze their contents.
Rewards
Completing the “Shady Business” quest brings several rewards to the player. These rewards include:
- +11,400 EXP, which contributes to the player’s overall progression.
- An increase in Jaeger’s reputation by 0.02, indicates the player’s trustworthiness and reliability.
- 50,000 Roubles, a valuable in-game currency that can be used to purchase essential supplies and equipment.
- With Intelligence Center Level 1, the reward is increased to 52,500 Roubles.
- With Intelligence Center Level 2, the reward is further increased to 57,500 Roubles.
- Additionally, the player receives one SSD drive, a valuable piece of hardware that can be used for crafting or sold for a profit.
Guide

To successfully complete the “Shady Business” quest, players need to find three Secure Flash drives during a raid and deliver them to Jaeger. These flash drives can be obtained from various locations within Tarkov. Here are some key locations where you can find them:
- Pockets and bags of Scavs: Eliminating Scavs and searching their belongings may yield the desired flash drives.
- Dead Scavs: Fallen Scavs sometimes carry valuable items, including Secure Flash drives.
- Common fund stash: These stashes can occasionally contain the flash drives you seek.
- Plastic suitcases: Keep an eye out for these containers, as they may hold the coveted flash drives.
- Safes: Exploring and unlocking safes might reveal the valuable flash drives hidden inside.
- Drawers: Thoroughly search through drawers, as they might hold hidden treasures, including flash drives.
- Ground caches: These hidden caches scattered across the map might hold the elusive flash drives.
- Buried barrel caches: Digging up these barrels can lead to the discovery of the desired flash drives.
- Airdrops: Occasionally, flash drives can be found within airdrops, but competition for these drops can be fierce.
There are also specific locations that have a higher probability of spawning flash drives:
- The lumber camp on Woods has a tent with a dedicated spawn for up to two flash drives.
- The two-story dorms on Customs have a campsite with a dedicated spawn for up to two flash drives.
- Dorm room 110 in the two-story dorms on Customs sometimes has a flash drive on the bed.
- PCs in the OLI, IDEA, and Goshan offices in the Interchange map might have flash drives plugged into their fronts.
Explore these locations diligently and search every nook and cranny to increase your chances of finding the required flash drives.
Conclusion
The “Shady Business” quest in Escape from Tarkov takes players on a thrilling adventure, uncovering the dubious activities of Skier. By obtaining and delivering the Secure Flash drives, players delve deeper into the game’s lore and earn valuable rewards.
Remember to be cautious and vigilant during your raids, as Tarkov is a treacherous place where danger lurks around every corner.

