Escape from Tarkov is a popular online tactical shooter game where players have to navigate through a city to collect loot and survive. In the game, players must complete various quests to advance through levels and acquire better weapons and gear.
One such quest is Gunsmith Part 20, which requires players to modify an M1A to comply with certain specifications. In this guide, we will provide a step-by-step guide to completing this quest.
Requirements
To start Gunsmith Part 20 quest, players must be at least level 37. Additionally, they should have a basic understanding of weapon modification and be familiar with the mechanics of Escape from Tarkov.
Objectives
The objective of Gunsmith Part 20 is to modify an M1A to meet the specified requirements. Players must ensure that the M1A has 60 durability, 20 or more ergonomics, 400 or less recoil, and a total weight of 7.3 kg or less.
They also need to attach an M14 UltiMAK M8 Forward Optic mount, Nightforce ATACR 7-35×56 34mm riflescope, Aimpoint Micro T-1 reflex sight, and Holosun LS321 Tactical device to the M1A. Finally, players must attach a magazine to the M1A.
Rewards
Completing Gunsmith Part 20 quest will reward players with 26,600 experience points, 0.03 Mechanic reputation, and 500 Euros. Players can also unlock the purchase of an AR-10 KAC QDC 7.62×51 Muzzle Brake Kit at Mechanic LL3 and Magpul MOE Carbine rubber butt-pad at Peacekeeper LL4. Furthermore, players will receive one AR-15 Hera Arms CQR pistol grip/buttstock and one Hera Arms CQR tactical foregrip.
Guide
Gunsmith – Part 20 is a quest in Escape from Tarkov that requires the player to modify an M1A to specific requirements. These requirements include a durability of 60, ergonomics above 20, recoil sum below 400, and a total weight of 7.3 kg or less.

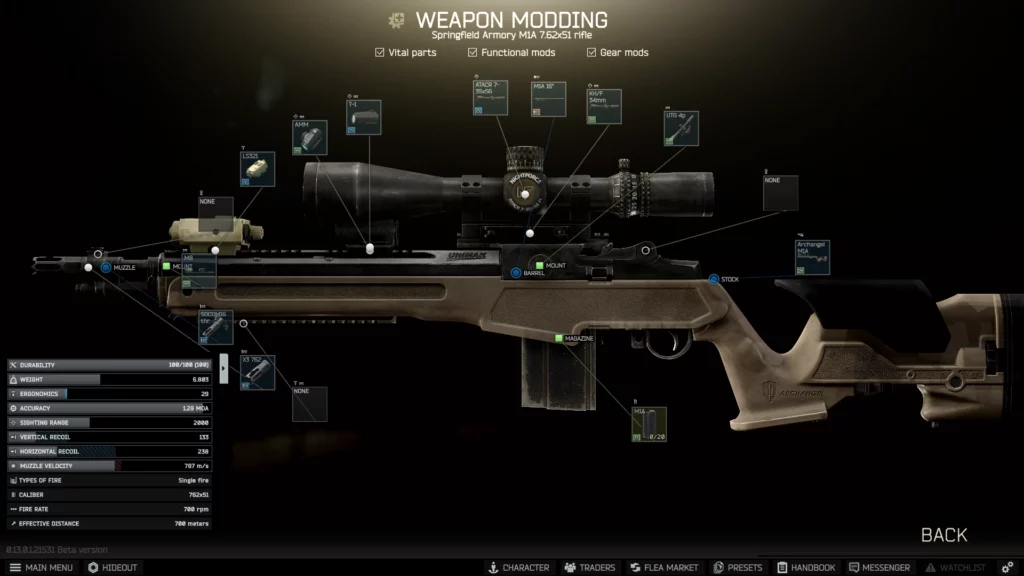
The M1A must also be fitted with an UltiMAK M8 Forward Optic mount, Nightforce ATACR 7-35×56 scope, Micro T-1 reflex sight, and a Holosun LS321 tactical device. Here is one example of a possible build:
- M1A 7.62×51 20-round magazine
- M1A ProMag Archangel chassis
- M14 UltiMAK M8 Forward Optic mount
- Nightforce ATACR 7-35×56 34mm riflescope
- IEA Mil-Optics KH/F 34mm one-piece magmount
- Aimpoint Micro T-1 reflex sight
- Aimpoint Micro Standard Mount
- Holosun LS321 Tactical device
- M1A Smith Enterprise SOCOM 16 7.62×51 threaded muzzle brake & gas block
- M14 Leapers UTG 4-Point Locking Deluxe mount
- AR-10 2A Armanent X3 7.62×51 compensator
Conclusion
Completing Gunsmith – Part 20 in Escape from Tarkov can be a challenging task, but with the right modifications to the M1A, it can be accomplished. The requirements for this quest are specific, so it is important to follow the guidelines closely.
By following this guide, players can successfully modify their M1A to meet the requirements and reap the rewards of the quest.
Gunsmith Part 1 / Gunsmith Part 2 / Gunsmith Part 3 / Gunsmith Part 4 / Gunsmith Part 5 / Gunsmith Part 6 / Gunsmith Part 7 / Gunsmith Part 8 / Gunsmith Part 9 / Gunsmith Part 10 / Gunsmith Part 11 / Gunsmith Part 12 / Gunsmith Part 13 / Gunsmith Part 14 / Gunsmith Part 15 / Gunsmith Part 16 / Gunsmith Part 17/ Gunsmith Part 18 / Gunsmith Part 19

